Two adjustments worth a double check before you start sighting in your bow – centre shot and peep sight position. A neat way to gauge whether your centre shot is on the money is to hold a bare shaft against the face of your riser sight window. Position the bare shaft just above your arrow rest, now pull down on your drop away rest activator cord and check that your nocked arrow is parallel to the bare shaft. Tweak the rest in or out until it is. Centre shot fine tuning will come later. Double check your nocking point location with a bow square too. With todays zero nok travel, parallel limb bows, a nocking point that has your arrow sitting at 90 deg to the string is the trick. So check your D-loop top knot sits the width of your arrow above 90 deg. Next comes the peep sight check. Draw your bow with your eyes closed, settle into your anchor and now open your eyes. You should be looking through your peep at a your bow sight that perfectly ghosts (rings) your peep. If you have to tilt your head down or lift your head up to get peep/bow sight alignment, you need to move the peep. Just move it by hand a little and re-check. When the peep is good, you are good to sight your bow in.
The first sight adjustment is to move your sight ring across until all the pins sit directly above your arrow. This takes care of your left and right.
Have a quick look at your bow sight, the position of the top pin, to be more precise. Most factory set pins will have that top pin of yours sitting a little above dead centre of your sight ring. Keep it there, OK!! That’s important to us bowhunters because most of our shots are going to be with our twenty metre pin. You want it where your eye naturally will find it – in the centre. And you want plenty of space above it so you can view your target as you get your pin on the spot. Stand at 7 metres from your target (or yards if you or your range finder works in them) and take a shot. If your arrow hits low, adjust the sight ring down to get the first pin on the spot. If arrow hits high, move the sight ring high. Do that a couple of times and you’ll be on the spot. Moving the sight ring means all the pins move as a gang and your first pin stays in the centre. Move back to twenty metres and see where you’re at. Adjust if need be. Shoot at twenty metres for a while until you know it’s dead on. Maybe you’ve done enough for today and tomorrow you can sight in the other pins at 30, 40 and 50 metres? Only this time you’ll adjust the sight pins individually.
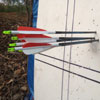
When you’re up for it, feeling fresh, walk back to forty metres and take some shots at a thin vertical line drawn on some cardboard. You may find your arrows group off to one side of the line. Move your rest to the direction the arrows hit a hair width. Make sure your sight pins still sit above the arrow. If they do and the arrows group on the line, your fine tuning of centre shot is done. Again, if you feel the need to tinker, try changing the arrow impact point by increasing or decreasing your poundage by half a turn on each limb bolt. You’ll find the sweet spot as you mess with the dynamic spine of your arrows. If you have lighted nocks, now is a good time to use them on dusk to confirm your arrows are leaving your bow like darts.
More on sighting in your bow…
Good quality bow sights are precision engineering marvels. The sight body sits plumb to riser, the sight ring level is level when your bowstring is plumb vertical and the pins are in line with your bow string. In other words your 1st and 2nd axis are taken care of with a quality bow sight. But if you feel the need to check for yourself, you’ll need a small level to hold against a flat section of your riser and then the sight mount bar. A bow vise helps, you can adjust it until the riser plane is vertical and it holds your bow still while you check the plumb of the sight body. Again, if you don’t think you will sleep at night until the 2nd axis is checked, use that same level against against the bow string (another bow vise job). When the bow string is plumb vertical the sight ring level should be centred. It’s rare to need to shim a bow sight into plumb. If you don’t bother with the sight level when you aim, you’ll be grinding your teeth by now, and you’re not alone. A lot of bowhunters remove the level so their ring is perfect clean circle. Checking the 3rd axis is of importance to bowhunters who shoot over long distances in very hilly terrain. The 3rd axis is best thought of as an in/out tilt of the sight ring like a door does on its hinges. The sight ring can tilt away or too you a fraction, yet the sight ring bubble still remains level – on level ground. The 3rd axis is tested at full draw where your personal shooting style and flex in the riser etc has an influence that might not be other wise measurable on the undrawn bow. Why bother? Good point. If there is some tilt to sight ring it can mean a poor hit on a steep down hill thirty metre plus shot that would have been a fine shot on level ground. Most bow sights don’t have 3rd axis/sight level adjustment, but all the top bow sight makers top end models have this feature.
There are purpose built tools used to precisely measure the 3rd axis. If you like to investigate this sort of thing, here’s a no fuss way to do it. Using a level as a straight edge to draw a vertical line down a cardboard square resting on the floor against a wall. This will be your steep downhill shot – stand over the cardboard and anchor etc as you normally do. Line up your gang of pins along the line and check your sight ring level. If the 3rd axis is out your level will be out a fraction. Place your vertical line up high and now aim an uphill shot at it. If your level tilts a fraction the opposite way, you know for sure your 3rd axis is out.
When you’re happy with your sighting efforts, no matter how simple or technical you make it, it’s a good idea to take some ‘just in case’ measurements. There’ll come a time when you’ll need to service your bow, replace the bow string and bow cable. So write down the axle to axle, noking point and peep distance to the top axle. Brace height too.