
This article is actually about making quality arrowsquality arrows that are matched to YOU and YOUR bow. And, a small, but very important, part of this arrow making process is squaring away your fletching technique so your fletching won’t come off your arrows. Making your own arrows is very easy when you know how. And it’s cost effective. Buying your own fletching jigfletching jig – it’ll repay itself after fletching a dozen and half arrows! Good archers and bowhunters have their arrows sorted. And I mean sorted. Period. They group tighter, get way better penetration and sharp bullet like arrow flight with quality arrows that are matched to their style of bowhunting and their bow. If you want a bit of this action, read on…
How do I determine my correct arrow length?
![]()
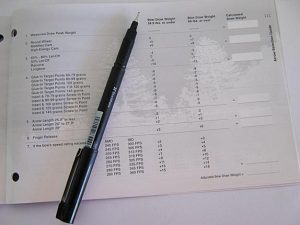
Using your bow, your release aid, draw back to your anchor point. In-store we mark the shaft where it protrudes “square” with the front of the riser – masking tape is ideal for this. At home you can do the same. Now measure the length of shaft from the end of the nock to the spot marked. When ordering arrows, if it’s easier for you, send us this length in millimetres. In-store we convert this into inches and adjust this length up or down a fraction to the nearest eight of an inch – this distance is now your standard arrow length. Arrow length is critical to correctly dialling in YOUR arrow choiceYOUR arrow choice. In other words – you can’t leave your arrows at full length and get the full benefit of the arrow matching process.
Measuring your bows actual draw weight?

Digital bow scalesDigital bow scales are the only way to go. The old school spring style jobs are ball-parkers. In-store we’ll measure poundage for you, but think about kitting yourself up with one of these bow scales if you are an adventurous bowhunter. They are invaluable for returning your bow to ‘set-up’ after a string change etc. It’s also a good idea to be checking your draw weight every three months so you know your bow is set-up ‘between the flags’.
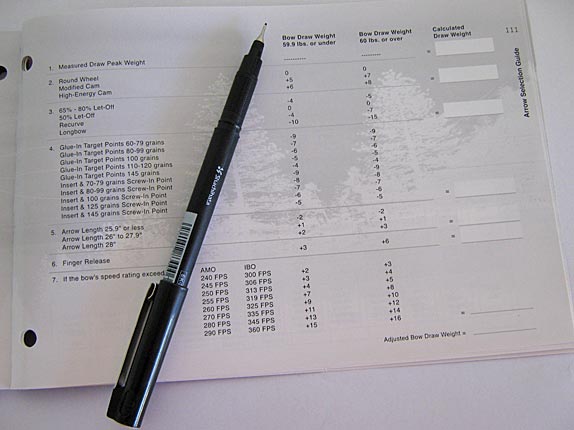
Adjusted draw weight – how do I calculate this?

It’s important to calculate your adjusted draw weight before you choose your arrows. Your adjusted draw weight might be the same as your bows actual draw weight or it might not. There are many variables that affect how an arrow reacts when shot from the bow. Cam type, bow speed, arrow length, release type and point weight all affect performance during flight. Use the CX adjusted bow draw weight chart (http://www.carbonexpressarrows.com/sites/default/files/CX_2011_BowDrawWeight.pdf) or we’ll double check it for you when you order your CX shaftsCX shafts.
Quality arrows, that are matched to you and your bow…
![]()
100% carbon arrows like those made by Carbon ExpressCarbon Express are the number one choice for bowhunters because they don’t bend, take a ‘set’ or crease like aluminium or carbon/aluminium shafts do in the rough and tumble of bowhunting action. They are the strongest arrow material, never bend and there is an arrow type to match every bowhunter. As always, we’re happy to help – experience dictates what shaft type is YOUR best fit.
How do I cut my carbon arrows?
There’s no getting around this one at home – only use a high-speed arrow cut-off saw. Using tube cutters or hand saws will damage the arrows carbon fibres. Plus you’ll never get a neat square cut and nearly always, your arrows will be different lengths! In-storeIn-store we cut your arrows – all part of the service.
Align your nocks…
This is me being obsessive – using your nock wrench (one comes with every CX pack of arrowsevery CX pack of arrows), align your nock index up with the same part of your arrows decal. They all line up proper on your bow quiver this way.
Glue in your inserts…
The big trick is to only buy inserts and field points that are an exact match for your shaft. That means the field points and insertfield points and insert shoulder are the same diameter as the shaft. With the CX shafts, points and inserts we stock – it’s job done. Use Araldite if you must – it’s pretty good. We use Bohning Insert IronBohning Insert Iron – it holds up better than any insert glue I’ve ever used, dries instantly and is easy to use. Clean the inside of the shaft with methylated spirits and a cotton bud. Many bowhunters screw all their broadheads to their inserts first, so they can align them all vertically or horizontally, depending on their bent. Have a cotton rag handy to wipe the excess glue up with and away you go – try to put just enough glue on so you wipe next to none off. Align your inserts quickly as Bohning Insert Iron dries almost instantly. You’ve been warned!
How do I set up my fletching jig?
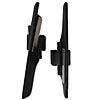
If you don’t ever plan to hunt, then treat yourself to a STRAIGHT fletching jig. Bowhunters must use HELICAL fletching jigs. Grayling fletching jigsGrayling fletching jigs are easy to set up. The instructions are dead easy to follow. The first part is to adjust your nock rotating knob so it aligns with the index mark – that takes a couple of minutes. Next you align the fletch clamp to your shaft. Put a bare shaft in the jig and an unglued vane in the clamp and check alignment. Adjustment is easy with the two knobs on the side. Adjust for maximum offset, but only up to the point where you can’t see light between the fletch and the shaft. It’s a good idea to mount your jig on a timber base for stability and maybe do a test fletch. Now you’re good to go.
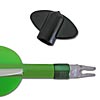
What fletching should I use?
![]()
I like Raptor 2inRaptor 2in (a slightly stiffer and half price version of Blazer) for speed and steering “fly like field tip” broadheads from fast bows shot by good archers. Fusion 2.2in slow the arrow up a fraction over Blazer and Raptor but steer the broadhead that bit more and offer a little more forgiveness. 4in Duravanes are excellent too, especially in windy hunting conditions with two blade broadheads, like the Tusker SpiritTusker Spirit.
How do I clean my fletching?
Some fletch manufacturers suggest you clean their fletch bases with acetone or methylated spirits. The makers of Duravane, Raptor and Fusion say this…”Why, oh why would you want to add to your workload? Our #1 goal is to make our product the easiest, fastest and best. Taking the time to clean the vane base seems like a lot of work, so no. Don’t bother cleaning the vane base. They won’t need it.” And I agree – in our archery shop – we don’t clean Raptor, Fusion or DuravaneDuravane bases and they stick to carbon like the proverbial. Having problems with your fletching coming off? Use Raptors, Fusion or Duravanes or use your your jig clamp to hold each vane and clean each base with acetone or methylated spirits and a clean cotton rag.
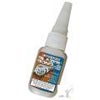
What fletch glue should I use?

The trend over the last few years has been away from Bohning Fletch-tite to the CA style instant fletch glues. Bohning have seen the writing on the wall for their Fletch-tite and have brought out their own instant fletch glue for 2013. So that’s it, we’ll continue to still stock Fletch-tite, but Bohning Blazer BondBohning Blazer Bond is the new king. You’ll use half as much glue as Fletch-tite, the vanes will tear before the glue lets go and clamp time is a mere 15 seconds with full cure in only two hours. Having problems with your fletching coming off? Use Bohning Blazer Bond. Make sure you drop a small bead of glue on the front and back of each fletch – you don’t want to miss that trick.
How do I prepare Carbon shafts for fletching?
Clean your arrow shafts by scrubbing with a clean abrasive pad (like Scotch Brite), using water and Ajax. Do not touch the portion of the shaft to be fletched, or the base of the vane, or allow them to come into contact with any surface once they have been cleaned. I teach everyone who’ll listen to hold their arrows by their decal – get into this simple habit and you won’t have problems with your fletching coming off.
How far away for the nock should I glue my vanes?

I’ve seen vanes glued anywhere from 1/4in to 1-1/4in from the end of the shaft to the back of the vane. Go for 5/8in, maybe a bit longer if you’ve got boofy fingers so you can place your nock on the string that bit easier. Sometimes a short brace height bow and drop away rest combo means a 4in vane must be fletched at 1/4in from the nock so the tips of the vanes sit back from the rest prongs. It’s really down to each bowhunters preference. It’s a good idea to mark the index you use on your fletching jig clamp with some of your car touch up paint or similar. Your eye will seeks it out each time you re-clamp a vane in and your fletching will be consistent.
What do I do if I want to re-fletch my carbon shafts?
Use a dull knife to remove old fletching and glue. Be very careful to only remove fletching and glue – do not remove any carbon fibres.